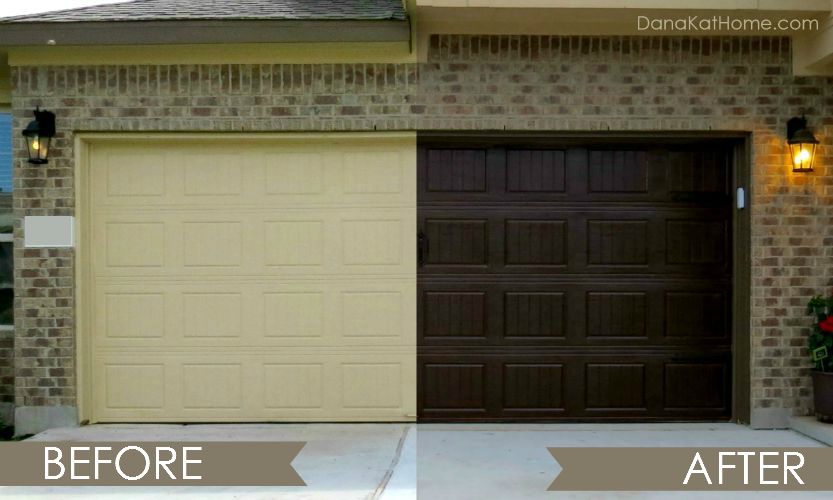
DIY : Faux Wood Garage Door
/I can't believe it has been so long since I have posted anything on this blog! The last couple of months of 2015 were a whirlwind, we had a birthday party for our daughter and I hosted a baby shower for one of my best friends. Then it was Thanksgiving and Christmas and.... time just ran away from me! But I am so happy to be back and I am excited to kick off 2016 with an awesome DIY tutorial!
We never really loved the paint colors on our house, they weren't what we would have chosen if we had the opportunity, but it wasn't enough of a dislike to keep us from purchasing our home. We really didn't like the golden tone of the main paint color and the garage door being painted that color didn't help at all. There was always the option to just paint the garage door the darker brown fascia color on our house but my husband really liked the look of wooden garage doors. So I did some research on how to get that look without spending an arm and leg on an actual wooden garage door. I have a fabulous painter/faux finisher that I use on my clients homes and from time to time on my own home and I picked his brain on what to do. He had recently faux finished a garage door and was kind enough to explain the basics to me.
So, one weekend I set out to do ours! I'm not going to lie, it was scary.... it was a big space on the front of our home and I had never done this... I had never even worked with the materials used... but I decided, what was the worse that could happen? I could spend hours and hours in the sun, faux finishing our garage and it could come out horrible and I could have to pay him to come and fix it... or just end up repainting it all together. I decided that it was worth the risk to me! I am here to tell you that not only did it turn out WONDERFUL, it was EASY and inexpensive!!
Supplies needed : Minwax Gel Stain in Hickory
2" Paint Brush (this can be an old brush, it does not have to be in great shape)
Soft Rags
Step stool so you can reach the top of the door
Step 1:
Wash your garage door with a mixture of water, white vinegar and a little dish soap. Use a scrub brush and get it nice and clean.
You want your garage to be a light beige/golden color to start with so if your garage is dark or is painted a color you will need to paint the whole thing first. Our garage was already the perfect color but I did paint the trim surrounding the door. This is extra. I painted it the darker brown of our fascia so it would blend in a little better with the door and not stand out so much once the door was "wood"
Step 2:
The gel stain dries pretty quickly and gets sticky so you will want to work in small sections, one panel at a time. Start on one side of the garage on the bottom panel. In order to get the "wood" grain effect you will want to paint the gel stain on in the direction that the grain would go in if it was actual wood. The picture above indicates how I did this on our garage door, your door may not be the same style so you may have to adjust slightly. As long as you do each panel the same it won't mater too much. This doesn't have to look perfect, you want some of the color underneath to show through, this gives it dimension. It will look a little streaky, but don't worry, we will go back and fix that.
1. Paint the center of the panel in up and down strokes
2. Paint the groves, the top and bottom in side to side strokes, the sides in up and down strokes.
3. Paint the portions on either side of the center panel in up and down strokes stopping at the groves as shown.
4. Paint the portions on the top and bottom or the center panel in side to side strokes creating making it look like on long piece of wood. The red line indicates where this stroke goes over the stroke in step 3.
On the edges where the rubber portions of the door trim are you will want to be careful not to get stain on them, but if you do just use a wet cloth and wipe the stain off and keep going. You won't see the portion of the door underneath the rubber so there is no need to stain that part.
Step 3 :
Move up to the next panel and do the same thing. Repeat on each panel working all the way up that column of panels and then over to the next column until the whole door is done. This will take some time, make sure you have some music! And sunscreen!
Step 4:
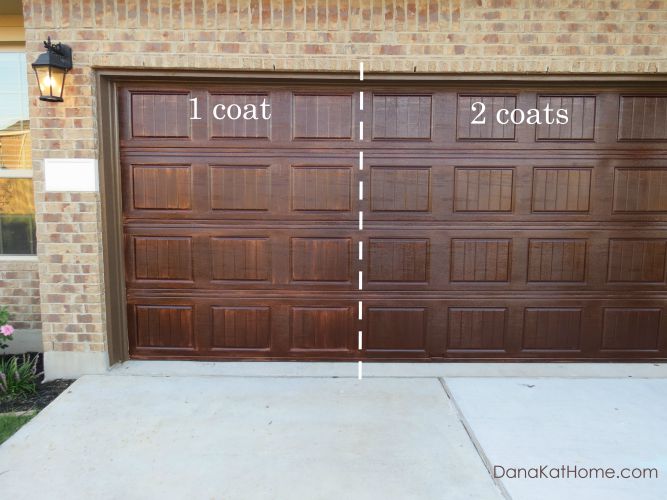
Once you have given the whole door one coat it will probably look pretty streaky. Let the door dry well, this will take a couple of hours, you could even let it dry over night. Then do the whole thing a second coat exactly like you did the first only this time you won't need as much stain on your brush and it will go much quicker. You will want to still leave a little of the underneath color peering through, but the additional coat of stain will take out that streakiness.
Bonus Step :
I you feel like it still needs a little more depth and dimension use a 1" foam brush and the gel stain to deepen up some of those areas even more. I went back through all of the grooves and made sure that they were nice and dark.
We also added carriage door hardware to our door, that was actually the most expensive part! We used this and this.
That is it! You are done! You don't need to seal it or anything!
This could be a very daunting project, I'm not going to lie, I was pretty anxious about it myself. Even after I bough my supplies, painted the trim and had everything set up to do the staining I paused and wondered if I was making a gigantic mistake. But my DIY motto is "Just Do It", because usually the risk is completely worth the reward and that is especially true for this project!


